
#275 ATtiny at 8MHz
How to run an ATtiny85 microprocessor at 8MHz using the internal clock.
Notes
The ATtiny85 runs at 1MHz by default. This project demonstrates how to run it at 8MHz while still using the internal oscillator.
To communicate with the ATtiny, I am using:
- avrdude from MacOSX
- an Arduino Uno running the ArduinoISP programmer sketch as documented in LEAP#070 ProgrammingWithArduinoISP
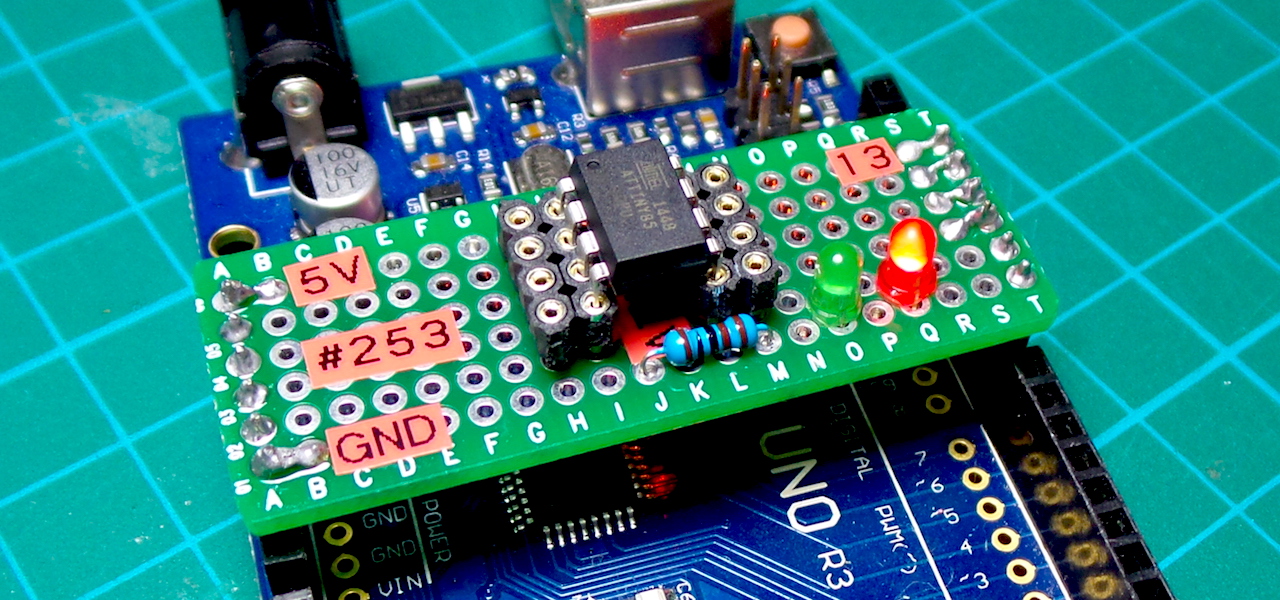
- the LEAP#253 ProgrammingShield to mount the ATtiny85 on the Arduino for programming
The 8MHz Internal Clock Configuration
8MHz operation is achieved with fuse settings for:
- internal 8 MHz RC oscillator (CKSEL=0010)
- no prescaler (CKDIV8=0)
Two easy techniques for setting the fuses appropriately are shown below:
- use the Arduino IDE (which uses avrdude under the covers)
- use avrdude directly
Checking the Configuration
The ATtiny85 can use an external clock, but by default it uses an internal oscillator. The internal oscillator runs at 8 MHz, prescaled to 1 MHz by default.
The clock settings are in the fuses. I used avrdude to read the fuses:
$ avrdude -c stk500v1 -p attiny85 -P /dev/cu.usbmodem14521 -b 19200 -U lfuse:r:-:i

avrdude: AVR device initialized and ready to accept instructions

Reading | ################################################## | 100% 0.05s

avrdude: Device signature = 0x1e930b (probably t85)
avrdude: reading lfuse memory:

Reading | ################################################## | 100% 0.02s

avrdude: writing output file "<stdout>"
:01000000629D
:00000001FF

avrdude: safemode: Fuses OK (E:FF, H:DF, L:62)

avrdude done.  Thank you.
The engbedded fusecalc site is invaluable for decoding or calculating fuses values.
It confirms that E:FF, H:DF, L:62 are factory defaults: 8 MHz internal oscillator with CKDIV8 prescaler: so it is running at 1 MHz.
Setting the fuses with the Arduino IDE
When using an Arduino as the in-system programmer, the Arduino IDE can be used to burn the correct fuse settings. This is too easy:
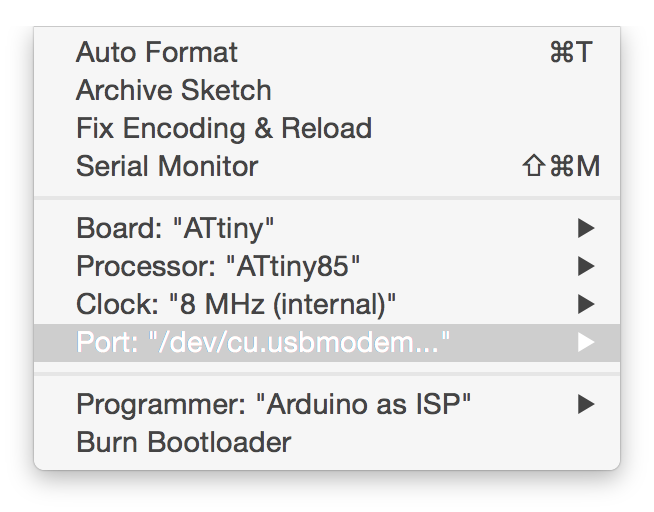
- make sure the correct ATtiny board and processor are selected
- choose the “8MHz (internal)” clock is selected
- then
Burn Bootloader
This will not only set the fusues, but erase any program already on the chip and lay down a fresh bootloader
The Arduino IDE log window confirms what is going on.. note the -Ulfuse:w:0xe2:m fuse setting.
Applications/Arduino.app/Contents/Java/hardware/tools/avr/bin/avrdude -C/Applications/Arduino.app/Contents/Java/hardware/tools/avr/etc/avrdude.conf -v -v -v -v -pattiny85 -cstk500v1 -P/dev/cu.usbmodem14521 -b19200 -e -Uefuse:w:0xff:m -Uhfuse:w:0xdf:m -Ulfuse:w:0xe2:m

avrdude: Version 6.0.1, compiled on Apr 14 2015 at 16:30:25
         Copyright (c) 2000-2005 Brian Dean, http://www.bdmicro.com/
         Copyright (c) 2007-2009 Joerg Wunsch

 .... etc - lots of guff clipped ...

avrdude done.  Thank you.
From the command line, I can interrogate the chip and verify the fuse settings:
$ avrdude -c stk500v1 -p attiny85 -P /dev/cu.usbmodem14521 -b 19200 -U lfuse:r:-:i

avrdude: AVR device initialized and ready to accept instructions

Reading | ################################################## | 100% 0.05s

avrdude: Device signature = 0x1e930b (probably t85)
avrdude: reading lfuse memory:

Reading | ################################################## | 100% 0.02s

avrdude: writing output file "<stdout>"
:01000000E21D
:00000001FF

avrdude: safemode: Fuses OK (E:FF, H:DF, L:E2)

avrdude done.  Thank you.
The engbedded fusecalc confirms the chip is now configured for 8MHz: E:FF, H:DF, L:E2 are essentially factory defaults but with one change: the CKDIV8 prescaler is off, so it is running at 8 MHz.
Setting Fuses Directly with avrdude
Updating fuses is simple with avrdude command line. This will leave everything else on the chip as-is. It uses the update option:
-U memtype:op:filename[:format]
Where
memtypewill be hfuse (high fuse byte), lfuse (low fuse byte), efuse (extended fuse byte).opisw(rite)filenameis just the hex value itselfformatism, which indicates immediate mode; actual byte values specified on the command line (in place offilename)
So setting the ATtiny back to factory defaults (E:FF, H:DF, L:62) can be done like this:
$ avrdude -c stk500v1 -p attiny85 -P /dev/cu.usbmodem14521 -b 19200 -U efuse:w:0xff:m -U hfuse:w:0xdf:m -U lfuse:w:0x62:m

avrdude: AVR device initialized and ready to accept instructions

Reading | ################################################## | 100% 0.05s

avrdude: Device signature = 0x1e930b (probably t85)
avrdude: reading input file "0xff"
avrdude: writing efuse (1 bytes):

Writing | ################################################## | 100% 0.02s

avrdude: 1 bytes of efuse written
avrdude: verifying efuse memory against 0xff:
avrdude: load data efuse data from input file 0xff:
avrdude: input file 0xff contains 1 bytes
avrdude: reading on-chip efuse data:

Reading | ################################################## | 100% 0.02s

avrdude: verifying ...
avrdude: 1 bytes of efuse verified
avrdude: reading input file "0xdf"
avrdude: writing hfuse (1 bytes):

Writing | ################################################## | 100% 0.02s

avrdude: 1 bytes of hfuse written
avrdude: verifying hfuse memory against 0xdf:
avrdude: load data hfuse data from input file 0xdf:
avrdude: input file 0xdf contains 1 bytes
avrdude: reading on-chip hfuse data:

Reading | ################################################## | 100% 0.02s

avrdude: verifying ...
avrdude: 1 bytes of hfuse verified
avrdude: reading input file "0x62"
avrdude: writing lfuse (1 bytes):

Writing | ################################################## | 100% 0.06s

avrdude: 1 bytes of lfuse written
avrdude: verifying lfuse memory against 0x62:
avrdude: load data lfuse data from input file 0x62:
avrdude: input file 0x62 contains 1 bytes
avrdude: reading on-chip lfuse data:

Reading | ################################################## | 100% 0.02s

avrdude: verifying ...
avrdude: 1 bytes of lfuse verified

avrdude: safemode: Fuses OK (E:FF, H:DF, L:62)

avrdude done.  Thank you.
Now to just change the CKDIV8 from its factory setting, I just need to update the low fuse:
$ avrdude -c stk500v1 -p attiny85 -P /dev/cu.usbmodem14521 -b 19200 -U lfuse:w:0xe2:m

avrdude: AVR device initialized and ready to accept instructions

Reading | ################################################## | 100% 0.05s

avrdude: Device signature = 0x1e930b (probably t85)
avrdude: reading input file "0xe2"
avrdude: writing lfuse (1 bytes):

Writing | ################################################## | 100% 0.06s

avrdude: 1 bytes of lfuse written
avrdude: verifying lfuse memory against 0xe2:
avrdude: load data lfuse data from input file 0xe2:
avrdude: input file 0xe2 contains 1 bytes
avrdude: reading on-chip lfuse data:

Reading | ################################################## | 100% 0.02s

avrdude: verifying ...
avrdude: 1 bytes of lfuse verified

avrdude: safemode: Fuses OK (E:FF, H:DF, L:E2)

avrdude done.  Thank you.
Verifying 8MHz operation
OK, the chip tells us we’re now running at 8MHz, but how to verify it?
One way to see the difference is to change the clock on a program that uses a timer-based function like delay
(which is locked to the processor clock frequency).
The At8MHz.ino is a simple example. It toggles LEDs attached to GPIO pins 1 and 2 with a 4 second delay (delay(4000);).
Load the sketch with the ATtiny set for default 1MHz operation (8MHz internal clock with /8 prescaler). The LEDs will toggle roughly once every 4 seconds.
Then reset the fuses for 8MHz internal clock with no prescaler (not reloading the program), and LEDs will toggle every half a second, which demonstrates that the processor is now running 8 times faster.
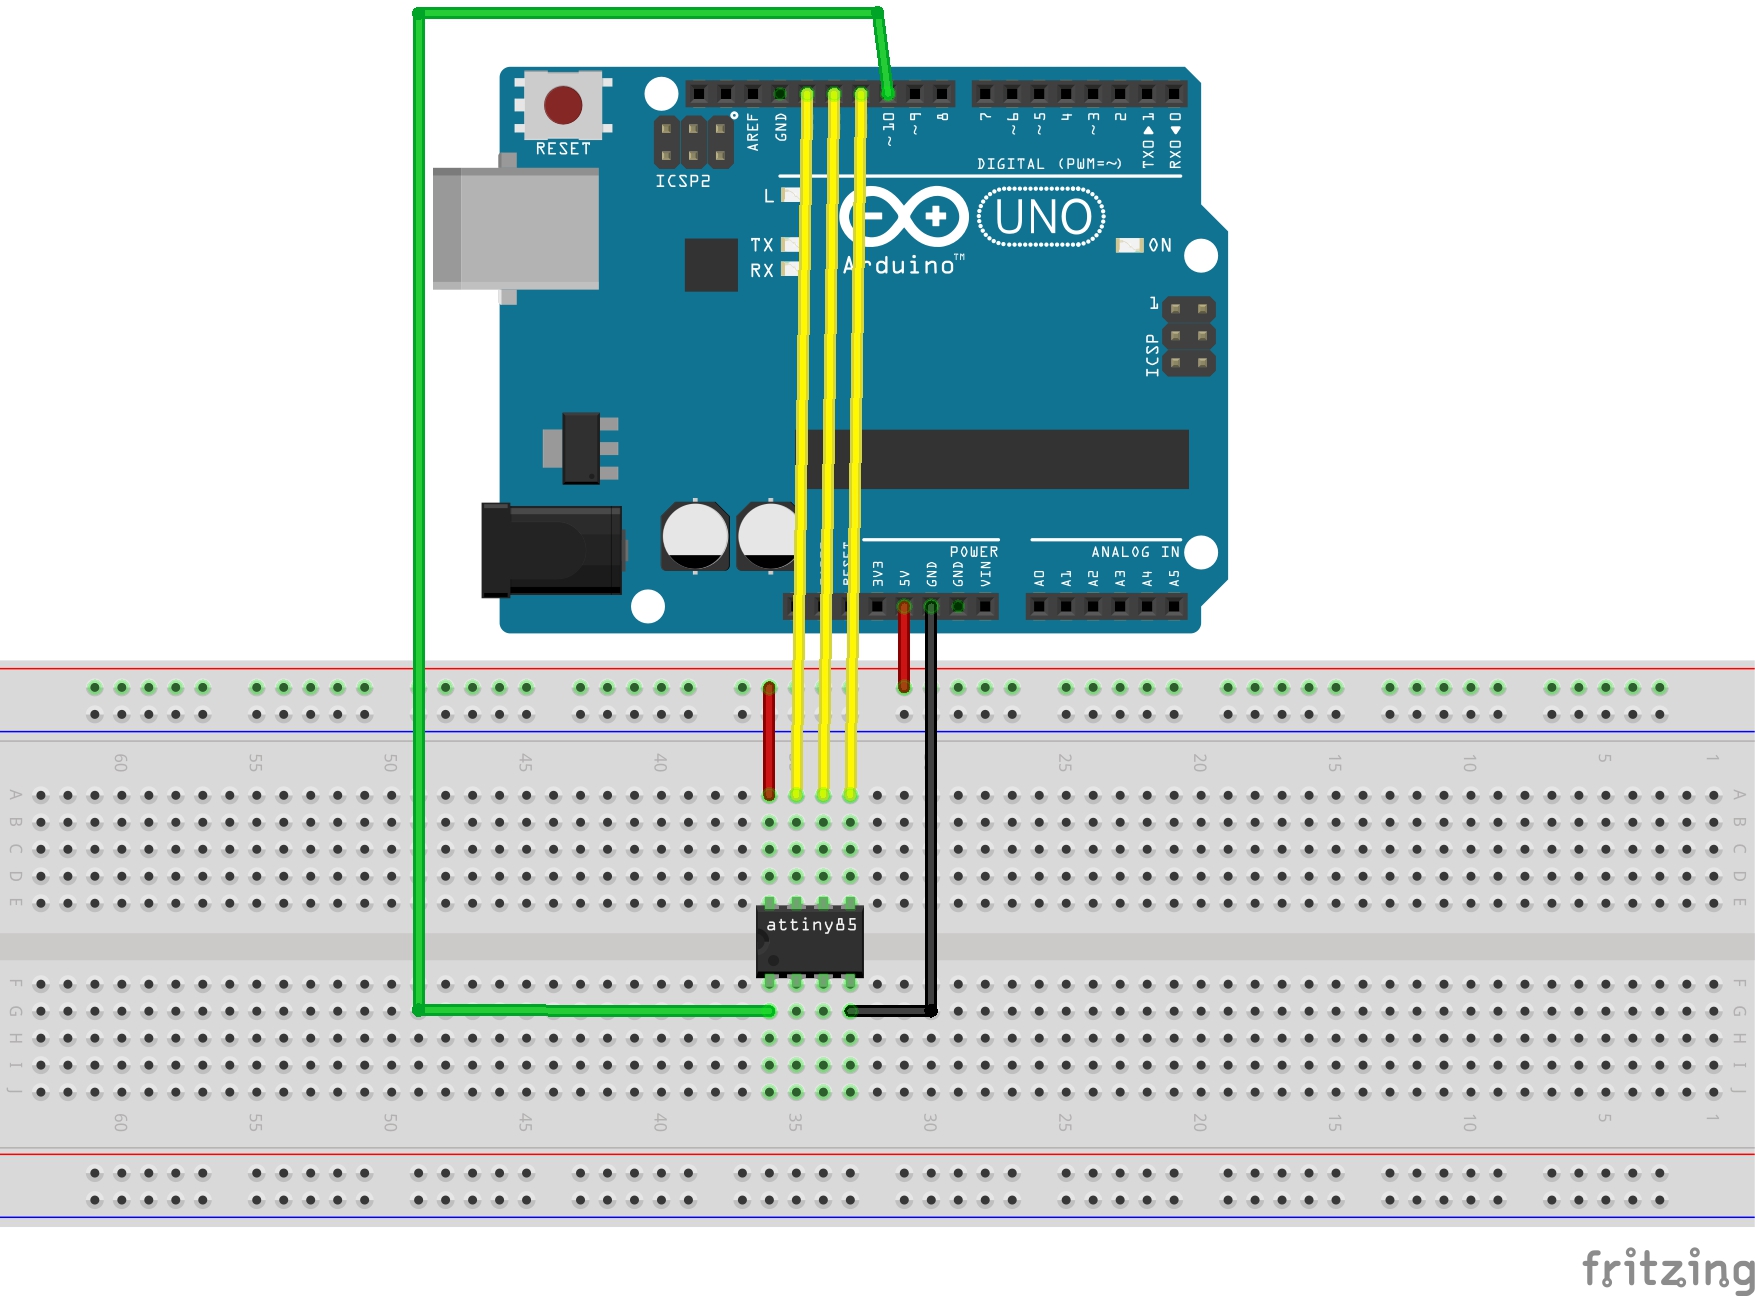
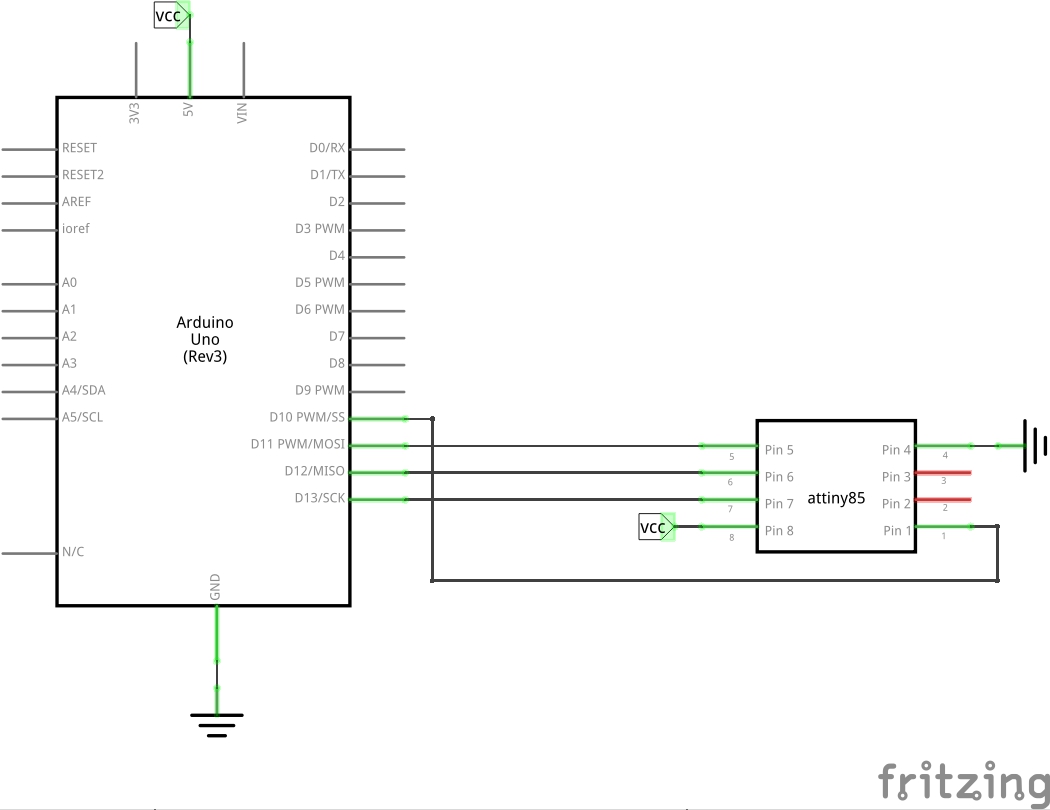
Construction
Designed with Fritzing: see At8MHz.fzz.
The Sketch
See At8MHz.ino.
The ATtiny85 is programmed using an Arduino Uno as described in LEAP#070 Programming an ATtiny With ArduinoISP.