
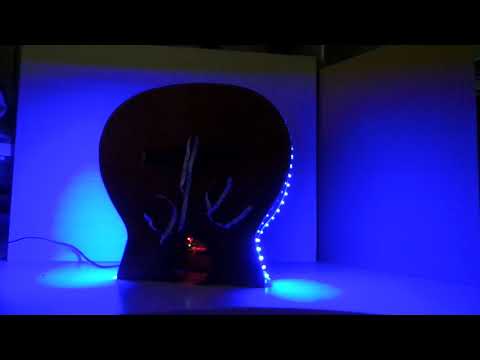
#404 arzamatron
Whipping together a simple sound-activated party decoration with the other half of the Fretboard guitar some LED strips.

Here’s a quick demo..
Notes
I’ve had the other half of the guitar I used for LEAP#018 Fretboard sitting on a shelf ever since. It’s almost been thrown out a number of times, but luckily I didn’t as it proved to be inspiration for this last-minute idea for a party decoration.
I only had a couple of hours so I used a few modules here where I think I would have preferred to use discrete circuits. But it did the job!
The basic idea:
- sound input
- 2 LED strip circuits independently controlled
- simple Arduino sketch to sample the sound and drive the LED strips with PWM
Driving the LED Strips
I had some 12V LED strips available in vaious colors. I chose some fixed color strips: one blue, the other white.
As they require 12V, I’m powering the whole device from a 12V supply (actually an old DVD power adapter I think).
IRF3205 N-channel MOSTFETs provide low-side control of the LED strips, yet can be adequately switch with only 5V on the gate (and a common ground).
The LED control circuitry is mounted on a small piece of protoboard that is pinned to insert as a shield on an Arduino Uno.
Sound Module
I had a Sound Detection Sensor Module in the parts box and decided to use this rather than build a disrete input sircuit.
I didn’t read the specs before hand - and it turns out this is not exactly what I was after. I assumed it provided a continous analog input, however it turns out is is a digital sensor circuit:
- it has an on-board threshold setting (potentionmoter)
- output is either HIGH or LOW is sound intensity is above or below the threshold
Unfortunately, I only realised this after the build, which is why the sketch is written assuming continuous input, and why I added a separate threshold input (100kΩ pot on A2)
The Arduino
I used an Arduino Uno for the build (because of time), but did envisage using a bare ATmega328 or even ATtiny, hence why I put a 7805 on the protoboard, and used this to power the Arduino directly from 5V.
There is a jumper to connect the 5V line. with the jumper remove, one can power the Arduino over USB (for programming and testing), while driving the LEDs with 12V.
Performance and Next Steps
Although the party is over now, I may make some further mods. Main two ideas:
- replace the sound module with an electret or piezo transducer circuit to provide continous input
- substitute the Uno with a discrete mcu - perhaps even an ATtiny
Construction
Protoboard “shield” layout:

Shield construction:


Installed:

In operation:
Schematic

