
#185 HB13 Stirling Engine
Building the Böhm Stirling-Technik HB13 Small Bonsai kit.
Here’s a quick video of the first firing of the engine:
Notes
A Stirling engine is a closed-cycle regenerative heat engine with a permanently gaseous working fluid. They are named after Robert Stirling who invented the first practical example in 1816.
Böhm is a small(?) specialist manufacturer from Germany that’s taken up a side-line in producing Stirling engine kits. When I first discovered them, I couldn’t resist.
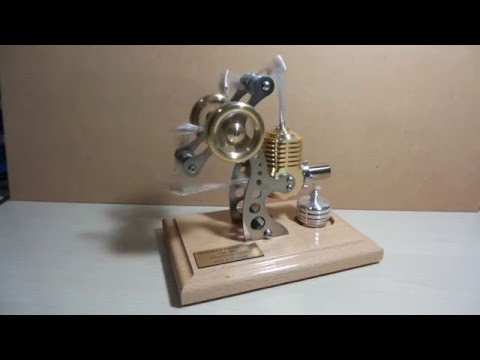
This is my first model - the Small Bonsai (HB-13).
I believe it’s strictly an alpha configuration with two power pistons in separate cylinders - one hot and one cold:
Everything went together in a few hours, and it fired up nicely on the first go!
A good read of the Support & FAQ pages prior to construction is highly recommended. There are essential tips not to be found in the main instruction documents.
Some things to note:
- See ALIGNING PIN ASSEMBLY for details on how to use the supplied jig to attach the connecting rods with pins
- Step (9) in the instructions does not mention inserting spacers 32 and 33. These need to be inserted as the rocker arms are attached to the side plate
- Step (12) does not precisely specify the assembly of screw, bushing and connecting rod. The diagram seems wrong for one rod. Played around till I think I have it right (screw -> rod -> bush -> crankshaft for both).
Overall the kit is very well manufactured. All parts arrived and are machined well, but could perhaps do with some better packaging in order to survive being shipped around the world. Just three minor issues:
- One of the connecting rods (21) arrived bent ~30˚ during shipping. It straightened out without trouble.
- The heating cylinder (23) had a slight ding. Rough shipping again? It doesn’t affect performance, and I was able to position the imperfection on the lower side, so it is not visible.
- The screws (42) around the heating cylinder (23) are just a little too snug (screws scrape the cylinder when tightening home). Assembles OK, but an extra micrometer or two would have made assembly perfect.
The only thing that had me worried was whether I could find suitable fuel in Singapore. Fortunately there was not problem - I was able to find a suitable bottle of denatured alcohol at my local Guardian Pharmacy for only $4.30.
So where are the electronics? None involved so far! But some ideas I have in mind:
- note the power-take-off (PTO) from the fly-wheel … that has possibilities for electricity generation
- and there’s finding a way to automate operation. I wonder what it would take to replace the alcohol fuel with an electric element?
Construction


The Finsihed Kit

Notes on the Fuel
According to the FAQ:
Only use 94% alc methylated alcohol. Never use paraffinic fuels such as oil or tea lights! This leads to extreme contamination and standstill.
Methylated alcohol is also known as methylated spirits - or generically “denatured alcohol”, but without undesirable additives. All the formulations of alcohol can be confusing and misleading, here’s my memory jogger:
- Denatured alcohol aka methylated alcohol, methylated spirits.
- typically ethyl alcohol (95%) and methyl alcohol (%5)
- may have other additives and colourings, especially if marketed for medical applications
- hobby use: fuel for alcohol burners; solvent for some cleaning applications
- Rubbing alcohol approximately 70% alcohol but with other additives
- if isopropyl alcohol, also known as “surgical spirit”
- alternatively may be denatured alcohol
- even if high percentage IPA, additives make it unsuitable for hobby use
- Isopropyl alcohol
- pure CH3CHOHCH3
- hobby use: solvent, especially for PCB cleaning

Credits and References
- Stirling engine - wikipedia
- Stirling motor HB13 – Small Bonsai product page
- Instructions Stirling Engine HB13
- Support and General Construction Tips
- Suitable denatured alchohol available at Guardian Pharmacy (Singapore) for only S$4.30
- ..as mentioned on my blog