
#117 SolenoidDIY
Build and test basic electromechanical solenoid.

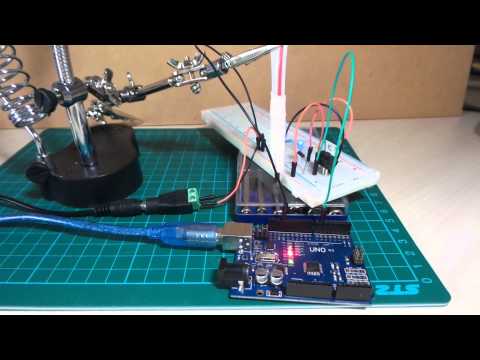
Here’s a quick video of the solenoid in action:
Notes
A solenoid technically refers to a coil of wire through which a current may flow to generate an electromagnetic field, according to Ampere’s Law.
The right-hand rule indicates the orientation of the field with respect to current.
In practice, the term solenoid usually refers to the electromechanical solenoid. This includes a steel or iron armature that moves in response to changes in the electromagnetic field.
The objective of this project is to construct a solenoid from scratch and demonstrate its operation with an Arduino.
Making the Solenoid
The solenoid I’ve constructed here is 9m of wire wound around a ~7mm drinking straw, in about three layers over a 4cm stretch. I didn’t count them, but that should work out at about 400 turns.
The wire used is similar to this product from a seller on aliexpress. It is 0.2mm enameled copper wire.
The resistance of the winding wire reads at around 10Ω in total. With a 9V supply, we’d expect a current of about 900mA. And that’s what I measure when I insert an ammeter in the circuit.
The armature is an old screw - some kind of mild steel I think.

The Circuit
An Arduino is used to switch the solenoid. A pulse of about 150ms duration is required to ensure the solenoid performs a positive and complete action.
An IRF540N n-channel MOSFET is used to switch the current to the solenoid. A flyback diode across the solenoid handles any back-EMF when power is cut. The MOSFET allows the 5V Android to switch the 9V power supply. The power supply is rated for 1A - just enough for this solenoid.
An LED with current-limiting resistor provides a visual indicator when power is on the solenoid.
Increasing the Force
It works! That has me pretty chuffed. But it is not particularly powerful. There are basically three strategies for increasing the force applied by the solenoid:
- higher current
- more turns
- higher permeability magnetic core
Construction


Credits and References
- IRF540 datasheet
- Solenoid - wikipedia
- Right-hand rule - wikipedia
- Engineer’s Mini-Notebook - Magnet and Sensor Projects
- Easy to Make Solenoid Engine
- Como Hacer un Motor de Solenoide - Muy fácil de hacer
- How to make a homemade solenoid
- Solenoid Basics - Part 1
- Create a Simple Solenoid Musical Instrument
- How to make a simple Electromagnet
- Homemade Mini Electro-Magnet
- 0.2mm enameled wire - seller on aliexpress