
#550 Black Magic Probe
Using the Black Magic Probe for debugging ARM/STM32 devices over JTAG and SWD, with a demonstration on MacOSX.

Notes
The Black Magic Probe (BMP) is a JTAG and SWD Adapter used for programming and debugging ARM Cortex MCUs. I got a Black Magic Probe V2.1 from the associated kickstarter but this is my first full test drive. For the examples below, I’m running on MacOSX.

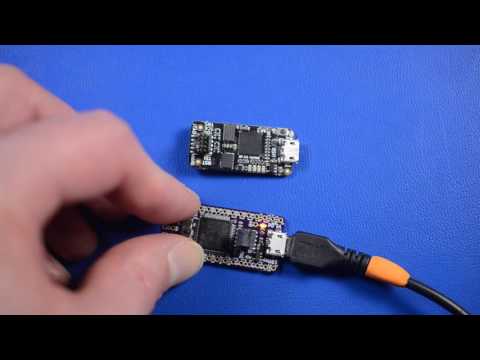
The pictures show the JTAG ribbon connected on the top, and a (slightly skewed!) serial adapter connected on the bottom.

The Black Magic Probe:
- plugs into the programming workstation (Windows, Mac, Linux) over USB
- runs an embedded GDB debug host - no other software required to connect a debugger
- supports three methods of connecting the target device:
- JTAG
- SWD
- serial
This is all handled by the STM32F103CBUx chip on the BMP itself. Here’s the schematic v2.1:

Learning How to Use the BMP
The Black Magic Probe wiki has most of the basics covered. The 1Bitsy & Black Magic Probe Linux Quickstart Tutorial is a good place to start:
Connecting the BMP
After connecting the BMP to USB, two “usbmodem” interfaces are detected by the operating system and each given a tty and character device handle. Note that naming is different than Linux (used in many of the BMP examples).
$ ls -1 /dev/tty.usb*
/dev/tty.usbmodem7BB19AA1
/dev/tty.usbmodem7BB19AA3
$ ls -1 /dev/cu.usb*
/dev/cu.usbmodem7BB19AA1
/dev/cu.usbmodem7BB19AA3
The first interface provides the GDB server, and the second provides a USB to UART adapter.
For GDB, I’ll be connecting on the GDB server’s character device /dev/cu.usbmodem7BB19AA1.
Demonstration #1: Programming and debugging the 1bitsy over JTAG
The 1bitsy is an open source STM32F415RGT6 development board (mine came in a bundle with the BMP). Unlike other small boards, it doesn’t skimp on exposing processor pins, including a JTAG header.
The JTAG ribbon cable provided connects directly to the JTAG header on the 1bitsy, but note the orientation.

I’m going to use the fancyblink program from the 1bitsy-examples for the test. I already have the GNU Arm Embedded Toolchain installed.
Setting up and compiling the examples:
$ git clone https://github.com/1Bitsy/1bitsy-examples.git
$ cd 1bitsy-examples
$ git submodule init
$ git submodule update
$ make
...(etc)...
$ cd examples/1bitsy/fancyblink
Here’s a transcript of a GDB session to program and debug on the 1bitsy:
Start GDB with the ELF of the program I’ll load into the device.
cd examples/1bitsy/fancyblink
arm-none-eabi-gdb fancyblink.elf
Connect to the BMP debug server, detect the target device with the jtag_scan command and attach it:
(gdb) target extended-remote /dev/cu.usbmodem7BB19AA1
Remote debugging using /dev/cu.usbmodem7BB19AA1

(gdb) monitor version
Black Magic Probe (Firmware v1.6.1) (Hardware Version 3)
Copyright (C) 2015  Black Sphere Technologies Ltd.
License GPLv3+: GNU GPL version 3 or later <http://gnu.org/licenses/gpl.html>

(gdb) monitor jtag_scan
Target voltage: 3.3V
Available Targets:
No. Att Driver
 1      STM32F4xx

(gdb) attach 1
Attaching to program: /Users/paulgallagher/MyGithub/LittleArduinoProjects/Equipment/BlackMagicProbe/1bitsy-examples/examples/1bitsy/fancyblink/fancyblink.elf, Remote target
0x0800032e in rcc_osc_on (osc=RCC_PLL) at rcc.c:493
493     RCC_CR |= RCC_CR_PLLI2SON;
Program the device; only required if I don’t want to monitor the code already installed on the target
(gdb) load
Loading section .text, size 0x688 lma 0x8000000
Loading section .data, size 0xc lma 0x8000688
Start address 0x8000564, load size 1684
Transfer rate: 3 KB/sec, 561 bytes/write.
Run the program, do all of the usual GDB type things: interrupt execution, step, inspect registers etc.
(gdb) run
The program being debugged has been started already.
Start it from the beginning? (y or n) y
Starting program: /Users/paulgallagher/MyGithub/LittleArduinoProjects/Equipment/BlackMagicProbe/1bitsy-examples/examples/1bitsy/fancyblink/fancyblink.elf
^C
Program received signal SIGINT, Interrupt.
0x0800026c in main () at fancyblink.c:60
60      for (i = 0; i < 6000000; i++) { /* Wait a bit. */
(gdb) list
55
56    /* Blink the LEDs (PA8) on the board. */
57    while (1) {
58      /* Toggle LEDs. */
59      gpio_toggle(GPIOA, GPIO8);
60      for (i = 0; i < 6000000; i++) { /* Wait a bit. */
61        __asm__("nop");
62      }
63    }
64
(gdb) cont
So far so good!
Demonstration #2: Programming and debugging the “Blue Pill” over SWD
The STM32F103C8T6 “Blue Pill” has an SWD header instead of JTAG. Debugging with the BMP is no different.
I used the little JTAG to 7-pin JTAG/SWD adapter board provided with the BMP. This makes it easier to wire up the SWD connections on the Blue Pill:

Here’s a transcript of a GDB session to program and debug the Blue Pill. I’m using the blinky.elf from LEAP#549 Bare Metal C on the Blue Pill as my example program.
Start GDB with the ELF of the program I’ll load into the device:
arm-none-eabi-gdb blinky.elf
Connect to the BMP debug server, detect the target device and attach it.
This is really the only step that is different when using SWD: I’ll use the swdp_scan command to find the device instead of jtag_scan:
(gdb) target extended-remote /dev/cu.usbmodem7BB19AA1
Remote debugging using /dev/cu.usbmodem7BB19AA1
(gdb) monitor swdp_scan
Target voltage: 3.3V
Available Targets:
No. Att Driver
 1      STM32F1 medium density
(gdb) attach 1
Attaching to program: /Users/paulgallagher/MyGithub/LittleArduinoProjects/ARM/STM32F103C8T6/BareMetal/blinky/blinky.elf, Remote target
0x080001a8 in delay (ms=500) at delay.c:7
7   for(uint32_t i = 0 ; i < ms * DELAY_COUNT_1MS ; i++);
Program the device; only required if I don’t want to monitor the code already installed on the target
(gdb) load
Loading section .text, size 0x2ec lma 0x8000000
Start address 0x8000266, load size 748
Transfer rate: 10 KB/sec, 748 bytes/write.
Run the program, do all of the usual GDB type things: interrupt execution, step, inspect registers etc.
(gdb) run
The program being debugged has been started already.
Start it from the beginning? (y or n) y
Starting program: /Users/paulgallagher/MyGithub/LittleArduinoProjects/ARM/STM32F103C8T6/BareMetal/blinky/blinky.elf
^C
Program received signal SIGINT, Interrupt.
0x080001a2 in delay (ms=500) at delay.c:7
7   for(uint32_t i = 0 ; i < ms * DELAY_COUNT_1MS ; i++);
(gdb) list
2
3 #define DELAY_COUNT_1MS      568U
4
5 // Command: a simple do-nothing delay for approximately `ms` milliseconds
6 void delay(uint32_t ms) {
7   for(uint32_t i = 0 ; i < ms * DELAY_COUNT_1MS ; i++);
8 }
Again, works great!