
#505 Rakit Baby8 Sequencer
Building the Rakit Baby8, an 8 step sequencer with CV and Gate outputs and a clock input.

Here’s a quick demo..
Notes
The Rakit Baby8 sequencer kit is a simple 8 step sequencer with CV and Gate outputs and a clock input.
Each step has an associated CV potentiometer, LED and switch. The CV potentiometers can be adjusted to emit anywhere between 0-5 Volts from the CV out jack when the step is active.
The Baby8 belongs to a rich tradition of CD4017-based sequencers. The design goes back to the 70’s and most people quote a column called “Captain’s Analog” that introduced a simple 10-step design called the Baby10 (I haven’t been abled to discover where this column was published or the author’s name beyond it being be a guy called Mark).
Parts
| Component | Qty | Checked & Installed |
|---|---|---|
| PCB | 1 | √ |
| Stand-offs and nuts | 4 | √ |
| 500k Potentiometer | 1 | √ |
| 10k Potentiometers | 9 | √ |
| 10u Electrolytic Capacitor | 2 | √ |
| 4u7 Electrolytic Capacitor | 1 | √ |
| 100n Ceramic Capacitor | 3 | √ |
| Blue LEDs | 9 | √ |
| SPDT Switch - right-angle connector | 1 | √ |
| SPDT Switch | 8 | √ (missing 1 in kit) |
| Mono Jack | 3 | √ |
| 1k0 Resistors | 4 | √ |
| 4k7 Resistors | 2 | √ |
| 10k Resistors | 4 | √ |
| 33k Resistors | 2 | √ |
| 47k Resistor | 1 | √ |
| 100k Resistors | 3 | √ |
| 200k Resistors | 8 | √ |
| 22k Resistors | 2 | √ |
| CD4017 | 1 | √ |
| CD4093 | 1 | √ |
| LM324N | 1 | √ |
| Battery Snap | 1 | √ |
| 1N4148 Diodes | 9 | √ |
| 78L05 5V Regulator | 1 | √ |


Construction
Rakit have a very clear assembly guide online. Recommended build sequence:
- switches
- resistors (except for 4093 bodge)
- diodes
- capacitors
- ICs
- LEDs
- battery clip
- potentiometers
- mono jacks
- power switch
- 4093 bodge resistor
- stand-offs
After an hour or two - the finished kit…


How It Works
The core of the sequencer is the CD4017 decade counter. This is nothing earth-shattering however - it simply uses the CD4017 as a designed as a decade counter. Each output has a potentiometer to set a specific output level, and diodes are used to steer the outputs to a common CV output.
The Baby8 embellishes the idea with:
- a switch on each output that will either cause the sequence to reset at that output, or skip the output (depending on a master reset/skip selector switch)
- optional external clock source
- 5v regulated power from a 9V+ external supply
A CD4093 Quad 2-Input NAND Schmitt Trigger is used for:
- a NAND oscillator to provide built-in clock source (with adjustable frequency and duty cycle)
- buffer the clock for a few different uses: driving a clock LED; triggering the Gate output
An LM324 low-power quad operational amplifiers used for
- clock duty cycle control (as a comparator)
- output buffering and amplification
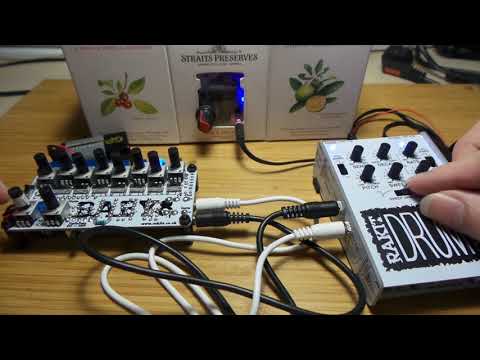
Test: Sequencing the Rakit Drum Synth
Some tips published on the Rakit blog: Baby You Can Bang My Drum: linking the baby8 & drum synth
- CV Out ⇨ Pitch - the CV out for each step is set with the corresponding pot. Feeding this into the pitch input will change the pitch at each step.
- Gate ⇨ Trigger - the gate triggers the drum synth at each step.
Here’s a quick demo of the Baby8 driving the Rakit Drum Synth..
Credits and References
- Baby8 Assembly Guide
- Baby You Can Bang My Drum: linking the baby8 & drum synth
- CD4017 datasheet
- CD4093 datasheet
- LM324N Datasheet
- CMOS 4017 Based 8 Step Sequencer - good discussion of how 4017 sequencers work
- Baby10 - Build a Classic Analog Music Sequencer