
#578 Hawker Typhoon
Building the Airfix 1:72 Hawker Typhoon Mk.Ib, electrifying it with an engine and rocket effects and displaying it with a ground attack vignette.

Here’s a quick demo..
Notes
The Hawker Typhoon was originally intended as a replacement for the Hawker Hurricane (which didn’t really pan out), but it later became one of the Second World War’s most successful ground-attack aircraft.
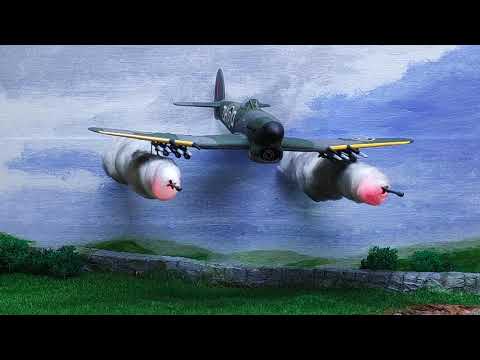
After electrifying a Harrier GR.1 in LEAP#558, I was inspired to try some more tricks to pack in some electronics into a 1:72 scale aircraft. One of the first ideas that came to mind was to try and reproduce the iconic image of a Typhoon on ground attack with rockets over Europe.
I picked up the Medium Starter Set - Hawker Typhoon Mk.Ib A55208 from local supplier Hobby Bounties and have been slowly working away over a couple of months.
The end result:
- Hawker Typhoon with motorized propeller
- rocket trails with LED effects
- a diorama base showing the plane on low altitude attack over generic countryside
What follows are my notes from the build, including full schematics…
Typhoon Kit Build

Hawker Typhoon Mk.Ib A55208 kit from Airfix is a new tool (2013) and packaged as a starter set with Humbrol paints, brushes and glue.
Engine Installation
The kit is designed to have a free spinning propeller, but I don’t think particularly designed to have an electric motor installed. There is ample room however, and I installed a 6.5 x 8mm micro DC Motor rated for 1.5V 0.005A and 20000RPM. This was from my stash of parts - but originally purchased from aliexpress.
Installing the motor means changing the sequence of assembly slightly, and also solving a few problems:
- mounting the engine securely - I wrapped the motor in masking tape to the required dimensions to fit in the fuselage and glued in place. This provides a secure yet dampened, somewhat flexible mounting
- connecting to the propeller - this was the biggest challenge, as any misalignment will either overload the motor or prevent the propeller from spinning at all.
Note the reverse protection diode mounted close to the engine on a small piece of protoboard. Also important to get the polarity for the motor correct so the propeller doesn’t spin backwards!

Test, test, test! Before taking any irreversible steps forward in the build.
Here I’m testing the motor with a 3V 555 timer PWM circuit. Yes, it is working!

With the lower wing installed, motor control wires exit near the rocket pylons:

Painting the Typhoon
I’m brush painting the kit with mainly the Humbrol paints supplied in the kit. Getting a reasonable finish takes many layers of thinned paint, but it’s hard to get a solid coverage without having the paint end up quite thick. PS: I now have an airbrush, so I think this may be the last time I brush paint larger surfaces!
| Colour | Paint | Notes |
|---|---|---|
| Dark Green | Humbrol 30 | |
| Black | Humbrol 33 | |
| Aluminium | Humbrol 56 | |
| Light Grey | Humbrol 64 | |
| Cockpit Green | Humbrol 78 | |
| Ocean Grey | Humbrol 106 | |
| skin tone | ad-hoc blend of art acrylics | pilot skin |
| Lemon Yellow | Vallejo 70.952 | propeller tips and control box |
Here are some shots before weathering and final assembly. Note that only 6 out of 8 rockets attached. Two will be in-flight!
After painting, the plane was finished with Mr Hobby Flat Matt Topcoat.


Building the Vignette Base
The vignette base is an ad-hoc rendition of an imaginary field with a stone wall and stream. Construction basics:
Basic construction:
- styrene foam base and structure
- toilet paper + mod podge
- plaster of paris for the wall rendering
Detailing:
- Woodland Scenics earth foam
- static grass
- some dyed lichen for bushes
- mod podge and gloss varnish for the stream (colours a bit off in the photo as it was still drying)

The rocket trails a BBQ sticks with LEDs and current-limiting resistor swathed in cotton wool and air-brushed for highlights.

The backdrop is a quick hand-painted generic “cloudy sky”. This is from a trial assembly before everything is complete:

Final Assembly
The motor control wires cut to length and terminated with pin headers. These plug into a socket embedded in the starboard rocket tail. I’ve added some small stand-offs (actually through-hole component wire trimmings) to the empty rocket pylon. These will allow the Typhoon to be positioned slightly above the rocket smoke trail.

The external electronics are packed into a 100x60x25mm black plastic electronic project box. The cover was airbrushed lemon yellow with the Airfix kit identification decals attached, and finished with Mr Hobby Semi-gloss Premium Topcoat.

The controller plugs into a wiring socket on the back of the backdrop:

The finished project is housed in a 30x20x20cm Acrylic Display Case:

Electronics
The electronics comprise:
- 3V battery power supply with switch
- RGB fast flashing 5mm LEDs with 100Ω current-limiting resistor
- the RGB LEDs run a fast animation sequence
- by having two in parallel for each rocket, the effects are randomized somewhat
- a better effect could probably be achieved with red fast flash LEDs or custom flashing circuitry but since I had some of these RGB fast flash LEDs on hand I went with those - the effect is not bad despite some of the colours not being that authentic
- a simple high-side current control circuit for the motor with variable resistor for some degree of speed control. The current-control approach is smoother than PWM, however it does sacrifice torque at “lower speeds”.
Since the motor control is high-side, only 3 wires are needed to connect to the project: ground; LED power; motor power.


Testing the circuit on a breadboard:

Gallery
Some glamour shots of the final build:


And a demo video:
Out and About
Added a project page on scalemates.
Entered the Mini-Airfix Hawker aircraft model competition and was chuffed with a consolation prize.

Credits and References
- this project on scalemates
- Medium Starter Set - Hawker Typhoon Mk.Ib A55208
- Hobby Bounties - where I got my kit
- A55208 at scalemates
- Hawker Typhoon - wikipedia