
#697 IJN/Mitsubishi A5M2b
Building the Wingsy Kits A5M2b in-flight for the 2023 Model Officers Mess birthday bash raising money and awareness for the Models for Heroes charity.

Here’s a quick demo..
Notes
Model length: 157.6 mm Wingspan: 229.2 mm
Kit contents:
- Plastic parts: 90
- 6 plastic runners
- 1 clear runner
- Photoetched parts: 48
- Film
- Decal sheet, 4 options:
- IJN Type 96 carrier-based fighter II 12 Kokutai, China 1938, (155)
- IJN Type 96 carrier-based fighter II 12 Kokutai, China 1938, (154)
- IJN Type 96 carrier-based fighter II 12 Kokutai, China 1938, (165)
- IJN Type 96 carrier-based fighter II Hyakurihara Kokutai, Ibaraki, 1940-1941 (113)
Scheme 4
IJN Type 96 carrier-based fighter II Hyakurihara Kokutai, Ibaraki, 1940-1941 (113)
| Feature | Color | Recommended | Paint Used |
|---|---|---|---|
| instrument detail | black | C2/H2 | H2 |
| Tail | red | C3/H3 | H3 |
| Fuselage | silver | C8/H8 | H8 |
| Prop front, engine | steel | C28/H18 | H18 |
| Cowling | Cowling color | C125 | H2 |
| Cockpit interior | Cockpit color (Mitsubishi) | C126 | H60 + H31 |
| Prop rear, antenna mast | Red Brown | C131 | H47 (darkened a little?) |
| exhaust | Burnt Iron | C61/H76 | H76 |
| Tire Black | C137 | ||
| IJN Gray | C35/H61 | H61 |
Circuit Design
The controller is implemented in code on an ATtiny85. Some circuit notes:
- the PWM outputs are used to control low-side n-channel FETs rather than directly drive the outputs. This ensures that current load on the ATtiny85 does not exceed limits (10mA per pin, 60mA total).
- the LEDs and accompanying current-limiting resistors are just for demonstration purposes - these can be changed as required for a particular application.
- the duty cycle of the motor control is set based on reading a variable resistor.
- a fly-back diode is placed across the motor to drain any voltage spike as the motor load is switched
- I initially built this to be run from 5V USB but got stumped trying to hide a suitable power supply in the picture frame. Luckily, the circuit also works just fin on 3V (2xAAA) - though I don’t know how long the batteries will last.


Testing the circuits on a breadboard:

Note: with this motor and propeller, I needed the motor connected in “reverse” for correct prop rotation.
Code Organisation
The main script MitsubishiA5M2b.ino runs the main loop. It uses two support classes to orchestrate the effects:
pwm_motor.h/pwm_motor.cppencapsulates the PWM motor drive, using variable resistor input to set the duty cycle.flame.h/flame.cppimplements the flickering algorithm for a the flames.- on each update it adjusts the flames brightness
- the maximum change per update is set by the brightness input
- the actual change in brightness is determined by the
mixvalue for each flame. This sets the percentage of the new value that is mixed with the old value. Lower values will mean more slowly changing updates
See the GitHub repo for sources.
The ATtiny85 is programmed using an Arduino Uno as the in-circuit programmer

Build Log
This is how I started - just past 7:30pm Singapore UTC+8. I’ve got the Wingsy Kits A5M2b “Claude” (early version) a micro motor, a pilot stolen from anther kit and a frame I’m planning to use for mounting.


we have ignition! motorising was a stretch goal, but the way Wingsy have designed the engine makes it quite easy to mount a micro motor .. controlled by a microprocessor .. it’s a micro machine;-)

engine detail coming together!

Saying goodnight from UTC+8 for now and see you all in the morning. Great time so far - caught the live streams starting with Oz and it got me moving. Got most of the subassemblies ready: have ignition; got air! Hopefully it’ll all just fall together tomorrow. As I write, the fund-raiser is already 15% to the goal .. and the event hasn’t even “started” yet. That is pretty amazing!

a bit of head-scratching later and I figured out how all the engine parts fit together!


a pity it’s all going to be hidden away, but I blew my morning time budget on the cockpit. the kit makes it pretty irresistible!


finally closed up the fuselage

Since the plane is in-flight, I need a pilot! I stole this from the Tamiya Ki-61 Hien kit and did a rapid paint job. I have a feeling the flying kit is a little too advanced for the Claude but, hey..


not enough time to paint my own background, so I tropical storm picture from a calendar (shot in Darwin actually)

put the electronics on protoboard and installed in the rear of the frame

stuck on the wall (to give it time to cure before I add the load of the plane)

a few coats of H8 later and I’m ready to call it a night (Sat). Just got final paint, decals weathering and installation for Sunday. Pretty confident of finishing this in 48 now!

painting the tail


canopy closed up and now starting to wrangle the wiring

mounted and wiring up..

smoke trails..

I was impressed by the kit decals: good strong white over red, and they settled down major rudder parts with nothing more than Mr Mark Setter and time.

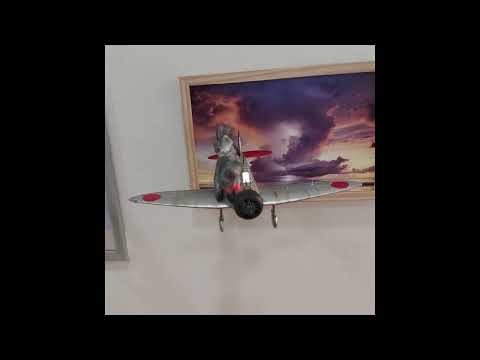
Mounted on the wall (velcro sticky strips - nice and secure).


Wingsy Kits A5M2b “bring it home through the fire and flames”. Had a little fun with an ATtiny for motor and flame effects.


Amazing - the model got featured as the Model Officers’ Mess banner for April 2023..

Credits and References
- this project on scalemates
- A5M2b “Claude” (early version) Wingsy Kits No. D5-03 1:48
- D5-03 IJN Type 96 carrier-based fighter II A5M2b “Claude” (early) 1/48 - wingsykits
- Mitsubishi A5M - wikipedia
- A5M2b ‘Claude’ (Early) D5-03 Build By Chris Meddings - Models for Ukraine Vol2 p114
- A5M4 D5-02 Build By Jeremy Moore - Models for Ukraine Vol1 p11
- Kawasaki Ki-61-Id Hien (Tony) Tamiya No. 61115 1:48
- ATtiny85 datasheet
- 2N7000 datasheet
- 1N4001 Datasheet